The first thing you should do when you get into the driver’s seat is to make sure your vehicle is safe to drive. You can do this by using a method called “The cockpit drill”. This involves ensuring you can reach all the controls comfortably and you can see out of your mirrors. It also involves a number of other checks that can be usefully remembered with the acronym DHSSSM. This is outlined below.
DHSSSM
D – Doors
Although this seems obvious, you need to make sure all the doors are shut. This includes the boot. If they aren’t closed properly, they could open while driving. Most cars will have a light near the speedometer indicating an open door. Other vehicles may make a beeping sound if a door is open after the car is switched on.
H – Handbrake
Make sure the handbrake is secure before you adjust your seat and mirrors so the car does not start moving off unexpectedly.
S – Seat
Most cars have a lever under the driver’s seat which can be pulled up to release the chair so that it can slide forwards and backwards. Make sure you can reach the steering wheel and the foot pedals. You should be able to push the clutch (left foot pedal) all the way down whilst retaining a slight bend in your knee and reach the steering wheel with a slight bend at the elbow. Your backrest should be upright and the centre of the headrest should be level with the top of your ears. If you have a modern car, you may be able to adjust the height of the seat to give you a better view of the road ahead.
S – Steering Wheel
If you have an adjustable steering wheel, there will be a lever which allows you to move the steering column up and down. Make sure: you can see all the display dials; that the steering wheel is not too close to your legs, and; it is locked in place.
S – Seat belt
You should put your seatbelt on once you have adjusted your seat and wheel so that you don’t cause it to lock. As the driver, you are also required to make sure anyone under the age of 14 travelling in the car with you is wearing their seat belt. Although you are not responsible for people over this age by law, it is still a good idea to check everyone is belted up before setting off.
M – Mirrors
Make sure to set your interior mirror and left and right door mirrors to an appropriate angle. The interior mirror can be set with your left hand to help you avoid touching the glass and should be set so that you can see as much of your car’s rear window as possible. The door mirrors should be set so that you can see the side of your car in only a small part of the mirror and about half road and half sky in the remainder of the mirror.
Foot Controls

Accelerator
The accelerator is found on the right-hand side of the three foot pedals found in a manual car and is often called the “gas” by the instructor simply because it is easier to say. The accelerator controls how much fuel enters the engine at a given time with more fuel going into the engine the more you press it down. More fuel means the engine spins faster leading to an increase in your speed.
The accelerator should be pressed gently with your right foot and your right heel should remain on the floor of your car. Although it will take a bit of practice to get used to, keeping your heel on the floor gives you more control and makes it easier to be gentle on the accelerator. Over time, this will become instinctive. The car will accelerate faster in lower gears with a stronger pull and more gently when you are in a higher gear so you should take extra care to be gentle on the accelerator in lower gears.
Taking your foot completely off the accelerator pedal causes the engine to slow down and, subsequently, the car will also slow down. If you “Come off the gas” in this way, you will use very little fuel so it is an efficient way to drive. With good hazard perception skills, you should be able to spot problems appearing on the road early which will enable you to come off the gas sooner, rather than braking late after you have accelerated towards a situation that requires you to slow down. You’ll save a lot of fuel by allowing the car to slow down rather than braking.
The Foot Brake
This is found in the middle of the three pedals in a manual car and is used to slow the car down more quickly than simply coming off the gas or if you want to bring the car to a stop. Again, you should use your right foot when pressing on the brake pedal, starting gently and pressing down more strongly as you slow down. This method of braking is known as “progressive braking” and helps to prevent the car from skidding or your car from implementing its Anti-lock Braking System (ABS).
Most modern cars have an ABS installed which makes your brakes come on and off quickly to prevent wheel lock which helps you to steer away from a hazard if you have been forced to brake hard. It will also commonly start to work in snow or in icy conditions and you will feel a pulsing or grinding sensation underfoot when it has kicked in.
You should be aware that when you press the foot brake, red lights turn on at the back of your car to warn people behind that you are slowing down. This means you should check these regularly and always keep a spare bulb in your car in case a bulb blows when you are out on the road.
The Clutch

This is found on the left of the three pedals and is the only pedal you should use your left foot for. When changing gears you should press the clutch all the way down. You should rest your foot on the floor when you are not using it otherwise you could cause a loss of power if you are partially pushing it down and reduce the length of time your clutch will last. The clutch should also be pressed down before coming to a stop to ensure the engine does not stall.
How does the clutch work?
Pictures A, B, and C below show how the clutch works. Essentially, the clutch is made up of two plates that come apart from one another when the clutch is pressed down and come together when the foot comes off the pedal (see picture C). From these pictures, you can see that one side of the clutch is connected to the wheels through the gearbox and the other side is connected to the engine. By pushing down on the clutch to select an appropriate gear you disconnect the engine from both the wheels and the gearbox making it safe to change gear. Once you release the pedal the clutch plates reconnect the engine and the wheels allowing you to accelerate if required.
Finding the “Biting Point”
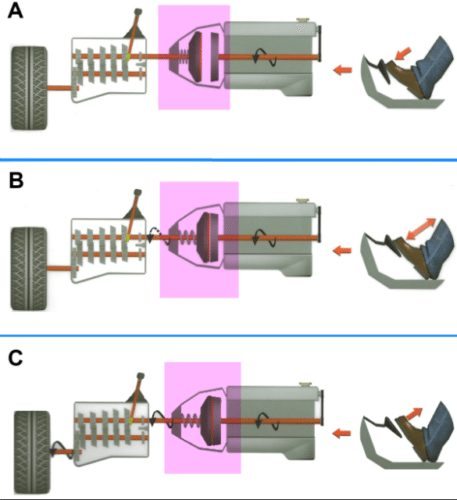 Somewhere in between having the clutch all the way down and all the way up is an elusive spot known as the “biting point”. This is where the clutch plates are holding together just enough to keep the car in place, such as on a hill, but are not connected completely enough to allow the car to move forward. You need to be able to find the biting point, which might be slightly different on different vehicles, in order to be able to confidently move off from a junction, hill or the side of the road. The general positioning of the clutch at biting point is illustrated by picture B above.
Finding the biting point is something that often takes learners a lot of time and practice to get right as if you push the clutch down too low, you won’t be able to move off and could even roll backwards. Moreover, if you bring the clutch up too high, you run the risk of moving off too fast or even stalling the car. Always remember that the clutch controls how fast or slowly you are able to move off.
Dual Controls
Typically, cars in driving schools will have something known as ‘dual controls’ which are a second set of foot pedals that allow the driving instructor to use if they feel they need to if they feel a situation is unsafe. They will always have a clutch and a brake pedal and sometimes also have an accelerator pedal. If the instructor has felt the need to use them they will tell you when and why they did so to help you learn from your mistake. As dual controls do not include a second steering wheel, driving instructors need to be positioned close enough to be able to reach the steering wheel in a situation they deem necessary.
Hand Controls
Handbrake
This is used to secure your car in place once stopped, whether that’s after a long pause at a junction, on a hill, at a stop sign, or you have parked. It is released by being slightly lifted and pressing the button which you keep pressed until releasing the lever once completely lowered. The handbrake is reapplied by pressing the button in and pulling it up until it resists and letting go of the button. If you pull the handbrake without pressing the button it will make a terrible noise and wear the ratchet mechanism.
Gear Stick
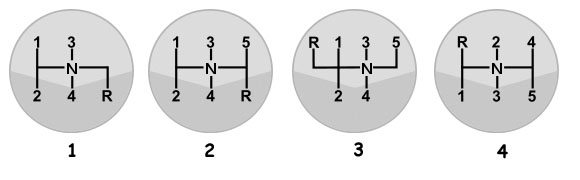 This is used to select gear. It should be left in neutral (ie. not in gear) before starting your engine. When you are in neutral no gear is selected and the stick will be able to move left and right without tension. Being in neutral means the engine is disconnected even when the clutch is up. Most modern cars have 5 or 6 forward gears and a single gear for reverse, with the most common being the middle image in the image displayed below.
Steering Wheel
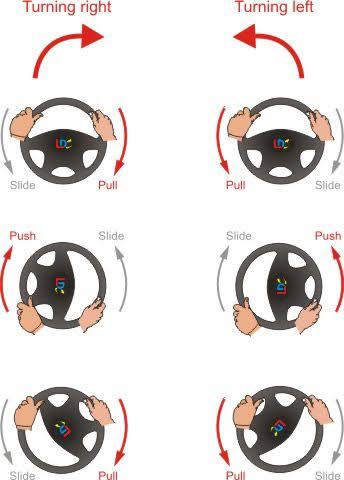 The steering wheel should always be held with two hands unless changing gear and held in either the “ten to two” or “quarter to 3” position as shown by clock hands. This helps you to maintain control and steer quickly if needed. When steering, use both hands and the pull-push technique which involves passing the steering wheel from one hand to another as you turn one way or the other.
The push-pull method of steering enables you to steer with control and without crossing your arms and can be used whether you are turning left or right. When turning left, pull the steering wheel down whilst gripping with the left hand and the wheel up when gripping with the right hand. As the picture shows, your hands will meet at both the top and bottom of the wheel as you turn and pass the wheel from one hand to the other. Reverse this method for a right-hand turn.
This can be tricky at first, but can be practiced at home with something circular like a plate or a Frisbee or in a quiet car park in an insured car for in-car practice. However, don’t be tempted to practice with a parked car as “dry steering” when your car is stationary can damage both your steering mechanism and your tyres.
Direction Indicators
These are usually controlled by a stick coming out of the steering wheel. You push the stick down to turn left and up for right if the stick comes out on the left of the steering wheel. If the stick is on the right of your steering wheel, you would push down to indicate right and up to indicate left. Normally an indicator will turn itself off after a turn, but if it is a shallow turn you made need to click it off after turning. As with any signal, you should check your mirrors before indicating to see if it is possible to do what you intend, such as change lanes or exit from a roundabout.
Auxiliary Controls
Headlights
Headlights can be turned on using the headlight switch which is usually found on the same stick as the indicators or sometimes on the right-hand side of the wheel on some models. Most cars have at least three headlight settings:
- Side Lights – If the day is dull, or areas are particularly well lit at night time these can be used. However, if in doubt, just use your dipped beam setting.
- Dipped Beam – This is the setting you will use most frequently and can be used at any time of the day. These are the most appropriate headlights to use when there is poor visibility due to fog, snow, or heavy rain.
- Main Beam – This should be used at night time when on an unlit road, so long as there is nobody coming towards you as you will dazzle the oncoming driver if you leave them on, on this setting. You should be able to easily flick between this setting and the dipped beam setting.
Hazard Warning Lights
Your hazard lights can usually be controlled with a button found on your car’s dashboard or just above the steering wheel next to the speedometer. These should be used in a number of scenarios:
- Blocking the road – If your car is causing a blockage in the road, for example, due to a breakdown.
- A hazard ahead – They can be used on the motorway or dual carriageway to warn people of a hazard ahead, such as if you are approaching a long queue suddenly, but should only be used for long enough to be seen and not left on as this will look like you have broken down in your lane.
Note: Hazard warning lights are not an excuse to park illegally and should not be used in this way.
Windscreen Wipers
These are normally found on a stick similar to the indicator stick that is on the other side of the wheel. There is more variation between car models for windscreen wipers but you will likely push the stick down or up to increase the speed of the wipers across at least 3-speed settings:
- Intermittent – This setting is used when rain or snowfall is light and only wipes the windscreen every few seconds.
- Normal Speed – When rain or snowfall is heavier and more consistent, you will need to use this speed which constantly moves back and forth. If the rain slows down you may hear a rubbing sound and should switch down to intermittent if so.
- Fast Speed – In heavy rain, you will need this setting. Like the normal speed, it is constant but much faster.
There is also a rear window wiper in most cars that may or may not have 3-speed settings. It typically involves the same stick but rather than flicking it up or down involves a twist of the stick. For use of your windscreen washer, you would usually push the same stick forward for the front or backwards for the rear.
Conclusion
The cockpit drill is a vital procedure to carry out each and every time you enter the car to ensure you can drive safely on the roads and does not take long to become a natural instinct. When driving in a new car it is also always worth taking a moment to see how your auxiliary controls work prior to your departure.